A Simple Guide to Displaying OpenCV Video Streams with PySide6 in Python
Deep learning applications, especially those involving image processing, often require intuitive visual output. While OpenCV’s native imshow method is simple, it falls short in terms of scalability and maintainability.
Qt is a mature UI framework that originated in C/C++ and is now fully supported in Python. While PyQt is a community-maintained package, PySide is the official Qt for Python library. In this guide, we will use PySide6 to build our interface.
Typically, image data is handled using OpenCV’s Mat format. Our workflow involves capturing frames from a camera or video file, decoding them into OpenCV Mats, processing them with an algorithm, and finally handing them over to Qt for display.
Importing Packages
import sys # Required for PySide6

from PySide6 import QtWidgets
from PySide6 import QtGui, QtCore
from PySide6.QtCore import *
from PySide6.QtGui import *
from PySide6.QtWidgets import QFileDialog, QMainWindow, QMessageBox

from generated_files.uic.mainwindow import Ui_MainWindow

import cv2
import numpy as np # cv2 mat is wrapped by numpy
Creating the Main Window Class
Inherit from QMainWindow to create your main window:
class MainWindow(QMainWindow):

    def __init__(self):
        super(MainWindow, self).__init__()
        self.ui = Ui_MainWindow()
        self.ui.setupUi(self)
Creating the Main Function
if __name__ == '__main__':
    app = QtWidgets.QApplication(sys.argv)
    win = MainWindow()
    win.show()
    sys.exit(app.exec_())
Running this will produce a blank window.
Designing the Interface with Qt Designer
- Create a UI form file using Qt Designer:
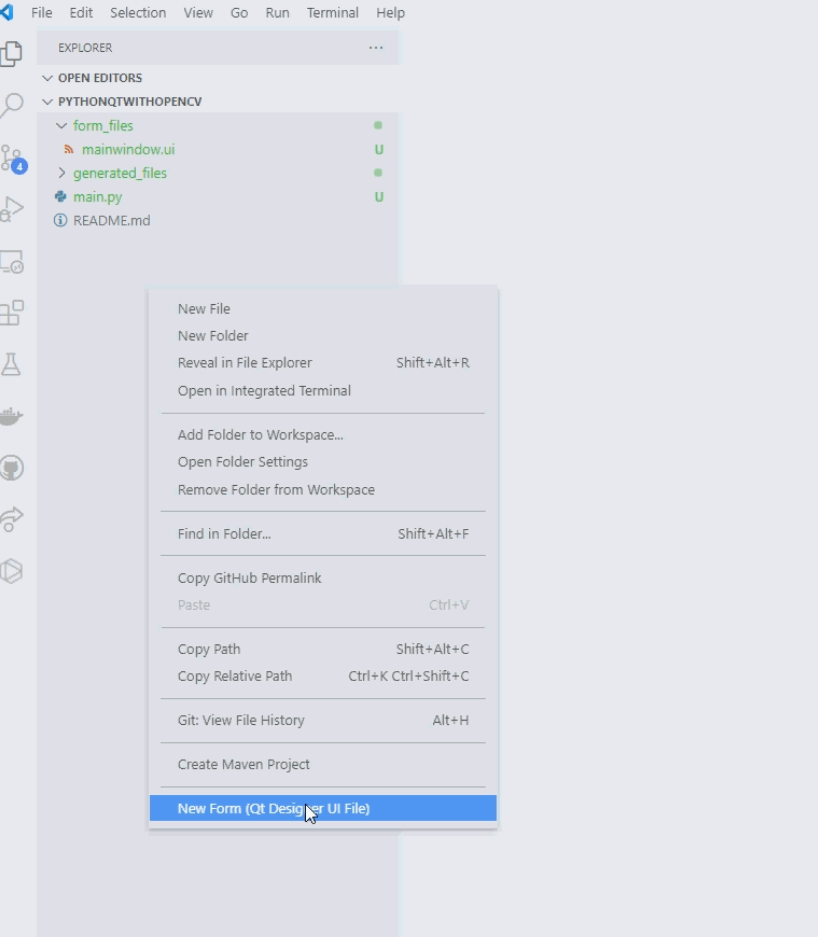
- Add a Label widget to the window:
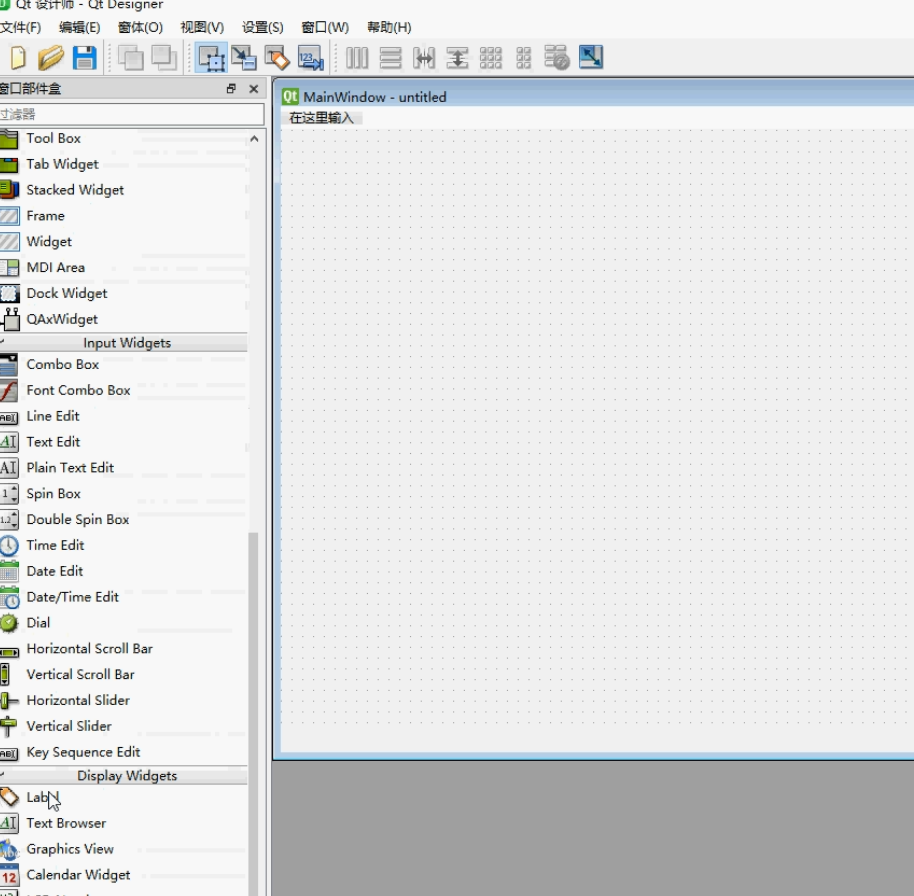
- Clear the default text and rename the object to
image_label: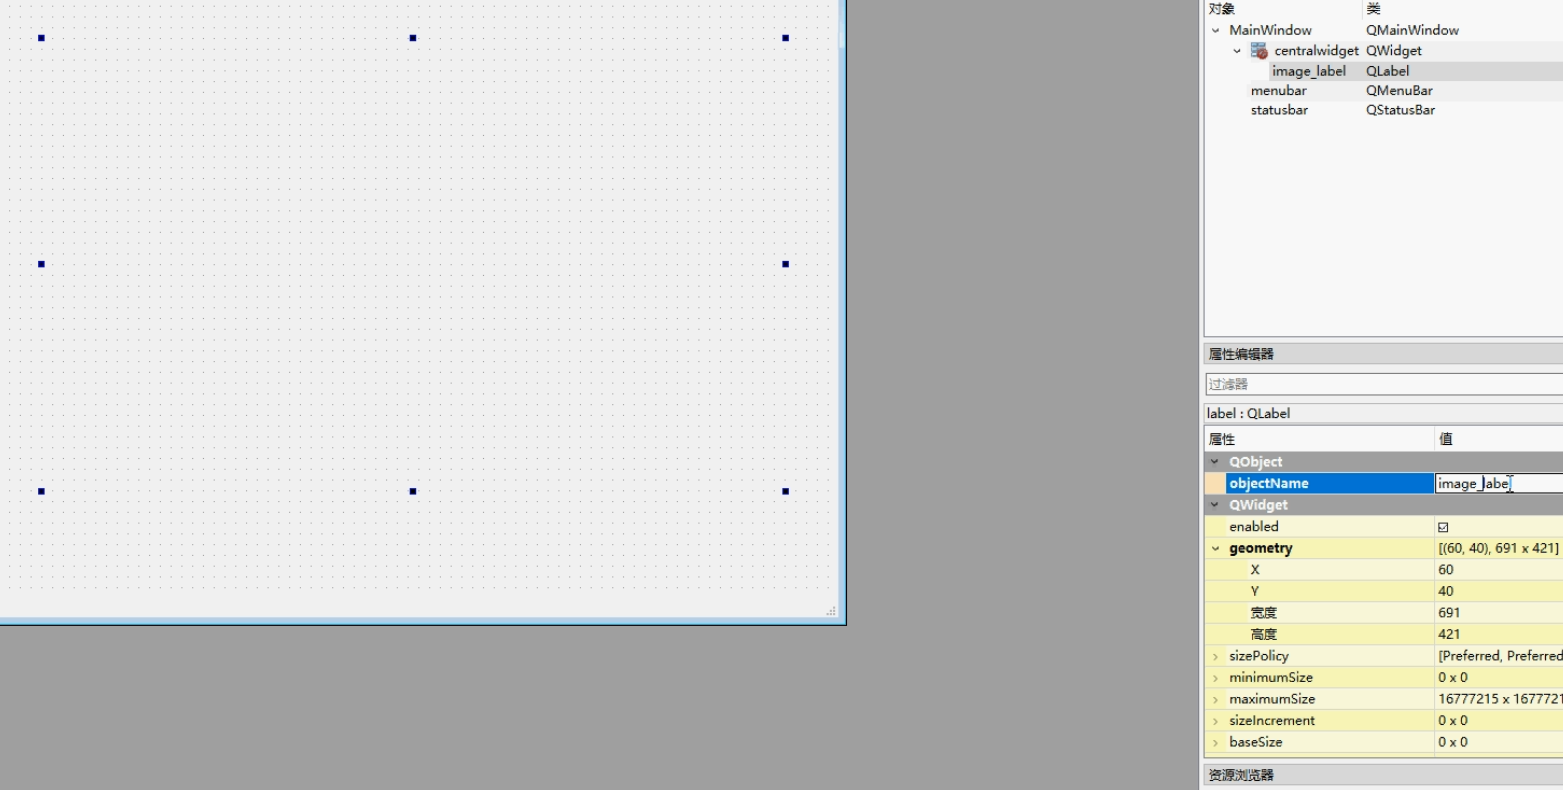
Implementing Data Capture
We use OpenCV to access the camera and a QTimer to fetch frames continuously. We define a method, display_video_stream, to read frames from the camera, and connect it to the timer to trigger every 30 milliseconds.
class MainWindow(QMainWindow):

    def __init__(self):
        super(MainWindow, self).__init__()
        self.ui = Ui_MainWindow()
        self.ui.setupUi(self)
        self.timer = QTimer()
        self.timer.timeout.connect(self.display_video_stream)
        self.cap = cv2.VideoCapture(0) # Open default camera
        self.timer.start(30) # Trigger every 30ms

    def display_video_stream(self):
        '''Display video stream from USB camera'''
        ret, frame = self.cap.read() # Get status and frame
        if ret:
            self.display(frame)
Image Format Conversion
OpenCV-captured data must be converted to a format compatible with Qt’s QLabel. We define a display method to handle this conversion:
    def display(self, frame):
        '''Display frame from OpenCV'''
        frame = cv2.cvtColor(frame, cv2.COLOR_BGR2RGB)

        image = QImage(frame, frame.shape[1], frame.shape[0],
                        frame.strides[0], QImage.Format_RGB888)

        self.ui.image_label.setPixmap(QPixmap.fromImage(image))
Full Code
import sys
from PySide6 import QtWidgets
from PySide6.QtCore import *
from PySide6.QtGui import *
from PySide6.QtWidgets import QMainWindow
from generated_files.uic.mainwindow import Ui_MainWindow
import cv2
import numpy as np

class MainWindow(QMainWindow):

    def __init__(self):
        super(MainWindow, self).__init__()
        self.ui = Ui_MainWindow()
        self.ui.setupUi(self)
        self.timer = QTimer()
        self.timer.timeout.connect(self.display_video_stream)
        self.cap = cv2.VideoCapture(0)
        self.timer.start(30)

    def display(self, frame):
        '''Display frame from OpenCV'''
        frame = cv2.cvtColor(frame, cv2.COLOR_BGR2RGB)
        image = QImage(frame, frame.shape[1], frame.shape[0],
                        frame.strides[0], QImage.Format_RGB888)
        self.ui.image_label.setPixmap(QPixmap.fromImage(image))

    def display_video_stream(self):
        '''Display video stream from USB camera'''
        ret, frame = self.cap.read()
        if ret:
            self.display(frame)

if __name__ == '__main__':
    app = QtWidgets.QApplication(sys.argv)
    win = MainWindow()
    win.show()
    sys.exit(app.exec_())
It’s that simple. 😊
The complete project is available here: https://github.com/BigBookPlus/PythonQtWithOpenCV.git.